Sunday, December 8, 2013

Recycled Timber Daybed

I haven't posted anything for a while, though it is with good reason. I've been renovating our house and backyard, and a part of that was making my wife a daybed for our courtyard. I wanted to make it out of as much recycled timber as I could, but it had to look clean and sharply finished. In making the daybed I only bought two pieces of wood (185mm x 19mm Oak boards) and helical decking nails, the rest was made using wood I've collected from broken furniture and home renovations. I'm going to get some pelts to lay over the daybed and Krystal is going to knit some blankets, to add to the rustic feel, and I'll post a few pics when it's all done. We're going for a Japanese/Fantasy theme to the backyard, which is why the focus is on wood/stone/iron and hand fashioned materials with a natural finish.

Dimensions:   1860mm x 1320mm x 450mm

Materials 

Corner posts:
4 x 430mm Cypress Gold (115mm x 115mm)

Side cladding:
6 x 2.4m Merbau and other hardwood skirting (115mm x 18mm)
8 x 2.4m Merbau and other hardwood skirting (65mm x 18mm)

Picture frame bed edge:
2 x 2.4m New Oak (185mm x 19mm)

Centre slats:
9 x 1490mm Tasmanian Ash (90mm x 19mm)
4 x 1490mm Tasmanian Ash (45mm x 19mm)

Framing:
Roughly 12 x 1.8m Structural Pine (mostly 110mm x 35mm)

Bed head:
We used the bedhead off of an old, broken queen size bed (1620mm x 1150mm x 90mm).

Surface Finishes:
500ml Gloss Clear Polyurethane (I use Cabot's, but any reputable brand is suitable)
200ml Decking Oil (for the Cypress Gold corner posts)
1lt White exterior house paint (I use Solagard Extreme, but again any reputable brand is suitable)

Fixing:
Slats, framing and picture frame  -  300 x 65mm Deckings Nails (3.5mm with helical screw)
Side cladding - 80 x 35mm Bullet Head nails (2mm galvanized)
Bed head and frame load points - 10 x 150mm Bullet Head Nails (4mm galvanized)


On the right are the side cladding (skirting boards), at the bottom the corner posts (Cypress Gold) and on the left is some structural pine.


You don't have to, but I like to sand and apply a couple of base coats to most of the visible wood before I started putting furniture together. This makes the finish on the joins look crisp and accurate, and makes the final finish super easy to apply (and much cleaner than if all the wood started unfinished).

The corner posts, from left: Raw, Sanded, Finished.


The side cladding, with two coats of white exterior paint applied.


Instructions

When working with recycled materials you can't write accurate instructions ahead of time; first you must get the materials and then work to their dimensions. In the case of this daybed the limiting factor was the bed head; there was no way that I could change its dimensions. That said it was about the right size so I just built around it.


First of all I had to brace the bed head. As it is now a structural member it can't be trusted to stay together firmly, so I've used some structural pine as a brace (the cream coloured piece).


Next is getting the basic dimensions right. With 5mm of overhang for the picture framing at the sides and front, I had to make it 1850mm x 1315mm from the outside of the posts. I used the side rail off of a broken bed, some structural pine and nails to tack and hold it all in place. At this point you should measure carefully and align all the corners at right angles. I use string lines and a tape measure to get it all correct, then commence the framing proper.


Once it's all measured and straight, a beam/joist centre goes in and is checked for alignment once more before having steel bracket nailed at a few beam/joist intersections to stay any movement. Then the picture frame is test fitted by using screws in each corner for easy adjustment. Only affix the picture frame surround with nails when all the centre boards are in place, and make sure that you use PLENTY of nails (I used about 25 for each edge piece). Once everything is straight, the centre can be clad with the Ash lengths. To space them out I used 4mm nails between boards, and affixed them with two nails per board per joist (total 10 per each length).


Once the top was done, the sides had to be added. This was done fairly simply by cutting three lengths of structural pine and screwing them into place so that the cladding has something to be nailed to. I used three on each side, leaving the rear open for ventilation and possible storage at a later date. The cladding was then affixed from the top down, ensuring that the first board was affixed straight so that the rest can simply to nailed in place accurately.  


Krystal, daydreaming and making it hard for me to apply polyurethane.


Once the sides are clad all that remains is the finishes applied to the wood. For the top I used an oil based wood finish (polyurethane) with a rag. I recommend wearing gloves, and all you have to do is rub in a thin coat, wait a day, then lightly sand and reapply. I applied 5 coats to ensure that it was super smooth and well protected.


The sides of the bed and the vertical slats on the bed head then received two coats each (sanded in between coats) of the white exterior paint, with the corner posts receiving another coat of decking oil each.


That's it! Just make sure that once a year you check on any exterior furniture to ensure that it doesn't require a coat of paint/clear. Furniture deteriorates pretty quickly outside, but as long as you take care of the exterior finish pieces will generally last a very long time (it also helps if you use hardwood). All you usually need to do is give it a quick sand and then a new top coat if it's looking a little damaged, or a heavier sand and a couple of coats if it's very badly weathered.

Cheers, all the best!

***

As an aside, the ground is soon going to be Bluestone flagstones and I picked up this brazier from a customer of mine who happens to be a blacksmith. It pumps out a lot of heat, and is basically what I imagine Sauron would use to roast marshmallows (if he was into that sort of thing).

Wednesday, April 17, 2013

How to make a Hylian Shield Pt. 2

Now that the face of the shield is done it's time to paint the back. In part 1 I didn't state how I made the border on the back of the shield. To do this I used simply used masking tape to create the shape and then used a thin layer of filler around the edges to build up a smooth border, being sure to remove the tape whilst the filler was still curing. Left to harden and then sanded it looks great, and the rivets are added the same way the rivets were added to the face of the shield (see pt. 1 for details). This was then spray undercoated in matt black and left to dry.


Base colours are painted on. Both silver and brown are applied with a heavy drybrush. You want to make the wood dark brown but leave black in the detail, as it comes through as texture and depth as it increases in contrast between highlight layers.


Layers of progressively lighter brown are added with an increasingly dry drybrush technique, with the final two highlights added by drybrushing vertical strokes to give the wood grain direction. This is so that it doesn't look like a slice of ply, but rather a number of boards or a thick piece of hardwood.

The metal border is five layers thick, using a different technique and/or direction with each layer so as to randomise the pattern and give it a consistently random metal texture. Clean up the edge where it meets the wood and you're done.


I decided not to make a wooden handle on the back, and instead made a leather/suede handle and leather thonging strap. The strap was plaited and half hitch knotted at each end, whereas the handle was a rectangle of suede wrapped with the black leather, half hitched at each end on the underside. The suede ends were then trimmed to be round, and some brads that I had in my parts box were added to look like metal studs. I then attached them to the back of the shield with a small amount of two part adhesive, clamped them in place and left them to cure.

Note: I used adhesive as this is a small decorative shield, but if you're planning to make a larger version that you plan to hold or use for cosplay I recommend that you affix the handle/strap with screws and adhesive.


I wanted the base to be minimalist and made out of hardwood because of its weight, strength and beauty. I managed to score a piece of 40mm thick Merbau off cut to use for the base, though I would like to note that I only used Merbau as it was an off cut. Merbau is one of the least environmentally friendly timbers in the world thanks to their depleting numbers and the methods used to extract them, and I wouldn't buy it or anything made with it new. However, as this piece was going to become wood chips I figured it would be better to rescue it and turn it in to something beautiful. Merbau is depleting quickly for many reasons, one of which is the fact that it's a gorgeous deep crimson colour and is extremely dense and heavy.


I decided that I didn't want a support on the base of the base as it would clutter the look, so instead I cut the base of the Merbau at a slight angle (around 7°) so that it supports itself.


With a mitre saw I cut three 5mm deep lines in the front of the base to represent the Triforce, after which I used a rotary tool to scribe a triforce shape in the middle front of the base, which was followed by a heavy sanding of the entire base. Holes were then drilled for the three pegs that I'd add to the base in order to support the shield. The pegs were added by dipping the end of a length of doweling in gloss lacquer, pushing it in to place and then using a saw to trim it to the appropriate length. Once complete the base and pegs were coated twice with high gloss lacquer and left to dry.

Note: It's better that you cut each peg too long and then adjust it when the lacquer has dried, because if you cut it too short you'll have to start all over again.


The pegs, being lacquered wood, are hard and will damage the shield if it is left on the base. To avoid this and give the base a rustic look that seems as though it belongs in Kokiri Village, I used some black leather thonging to bind rectangles of red suede to each peg. Once bound the thong was tied off with a double hitch close to the base of each peg and trimmed flush. 


Finally, I used some clear tape to mask clean edges for the Triforce that I'd scribed in to the centre of the base and then painted in gold.


The Finished Product


If you've got any comments or questions about anything to do with this project please comment below and I'll get back to you as soon as I can.

Cheers!

Wednesday, April 10, 2013

How to make a TARDIS Front Door

So we have a front door. I know right, how weird is that? I decided that the door was pretty ordinary and needed to be replaced. After taking it off its hinges it was still in great condition internally, so a new coat of paint and new hardware would bring it back to life. However, post preparation I still wasn't sure what colour it should be. At this point my wife laughingly said, 'It'd be cool if it looked like the TARDIS.' I stood for a moment and thought, why not? I don't mind and it'll make her happy, so I asked her if that's what she really wanted and now here we are.

Before I start, I want to note that I offered to make the door look exactly (to scale) like the TARDIS of the David Tennant era. However, my wife preferred that I make a homage to it rather than a replica (her words) as she likes the door's lines and hardwood texture. With this in mind I had to compromise and build it so that it's recognisable as the TARDIS without being a replica. I think it turned out alright in any case.


What I used

Wood - I used four pieces of wood; 
1) 64mm x 19mm Pine ('POLICE BOX' sign backing)
2) 22mm Hardwood Moulding ('POLICE BOX' sign trim)
3) 25mm Pine Moulding (vertical strip the runs up the middle of the door)
4) 25mm x 10mm Recycled Hardwood (for the 'PUSH TO OPEN' sign framing) 

Blue Paint and Mineral Turpentine - A gloss external paint is best as it'll last the longest. A 500ml pot will be enough for the whole door with plenty left over for touch ups/recoats down the track. 

Black Spray Paint - This is for the sign background. You can paint it with a brush but spraying it will result in a smoother, more consistent finish with no streaks.

A Paint Brush, Sandpaper - I used a roll of 120 grit and a 1 1/2" brush.

Handles - I used two brushed stainless steel handles with stainless screws. Make sure you use stainless screws as they will be left unpainted and therefore exposed to the elements.

Lettering - I used white vinyl decals that I ordered online from http://www.letterstickers.com.au/. I hadn't used them before this project but it was easy to customise my order and they delivered the decals quickly and with a confirmation email.

Mitre box and saw or compound saw


What to do

To begin with I took the door off its hinges, removed all the hardware, filled any holes/imperfections and sanded it back to be ready for painting. Once that was done I gave it a gloss undercoat in white for paint adhesion and a better finish, as well as to seal and protect the door from the elements.


Once I was happy with it I remounted it and made sure it closed properly, after which I applied three coats of blue gloss. Note: You don't have to remove your door if you don't want to, particularly since rehanging it can be difficult if you don't know what you're doing. Well, hanging it isn't so much the problem so much as getting it to close and open as it should.


 The painted door with hardware attached (bad photo, I know).


Here are the three new pieces of wood and the recycled hardwood (from renovations), for reference. Each was sanded and painted before being assembled as this makes life much easier (in my experience, anyway).


The hardwood moulding for the sign border, painted and cut to size with 45deg corner mitres.


The internet makes getting custom vinyl graphics just SO easy. I used Helvetica Medium as it was the closest font to that used on the TARDIS that was available. I believe Gill Sans is the exact font used on the TARDIS in the TV series.


I don't have photos of my building the sign box and notice frame as the battery on the camera ran out (boooo!). However, it was a simple process. 

The 'PULL TO OPEN' notice frame was made from the recycled hardwood by cutting 45deg mitres and using 20mm stainless tacks to put it together and affix it to the door. The notice itself I made using Word, a reference image of the original sign and a fair bit of work given to finding the right fonts (Times New Roman and Arial fit well), spacing and kerning. Once done I simply printed it up and laminated it, then cut it to size.

The 'POLICE BOX' sign was an 800mm length of pine with the hardwood moulding cut to fit the outside. 

The strip running up the centre of the door was simply painted, cut to size, nailed on (20mm tacks) and a final sand and recoat was applied. Make sure you measure for each piece with the door shut, otherwise you might make it a bit too long and you won't be able to close it.

Once both the notice frame and sign box were built and fixed to the door the mitre gaps were puttied, the paint lightly sanded and then a top coat was applied. The brushed steel handles were then added.

Finally, the signage. My wife really wanted to put the 'BOX' text on, so below is her doing exactly that. Applying vinyl decals is easy - peel off the backing, place the text, use a flexible blade (a credit card is perfect) to smooth it on and then carefully remove the transfer paper. Done!


The Finished Product

Though the pedantic individual within wanted to make a scale reproduction I'm rather pleased with the result. However, my wife is ecstatic! Her face when I was finished was priceless, which is the most important thing of all. NB: The hole on the left side of the door is for the deadlock, which I installed after these photos.


I hope you enjoyed this tutorial. Please comment below if there's anything you'd like to ask about the project, or anything to do with a project of your own. Cheers!

Wednesday, March 27, 2013

How to make a Hylian Shield Pt. 1

One of my first major video game crushes was the very first Zelda, given to me by my parents for Christmas when I was 5. I absolutely fell in love with that game and played each sequel as they came out over the years, and to now see it be so popular is a delight. There is so much love and attention given to Zelda collectables, artwork and fandom in general. A friend of mine is similarly smitten by the Zelda series (in truth most of my friends have fond memories of playing a Zelda title), so I decided to make him a miniature Hylian Shield. As you do.

The shield itself is about 25cm tall (10") and 12mm thick, though naturally you can choose to just enlarge each element to suit the size you want to make it. This project is great as it requires only a few different elements, so if you haven't done anything like this before this is a pretty good place to start.


What you'll need

2.8mm Plyboard - You'll need around 1000mm x 250mm to make a shield of this size.

Epoxy Filler - The higher the quality, the better. I used around 100-120 grams in this project.

Buttons - These form the bold rivets located around the steel edge of the shield.

Water Based Paint - Because of the limited colour palette I only needed 9 colours. There are many brands to choose from but I use Citadel miniature paints as I've had a lot of experience with them and find them to be equal or better than any other product on the market.

Clear Gloss Lacquer - This is optional but will give the colour on the shield a much deeper hue with a reflective finish, in addition to protecting it. It also serves to divide the metal and decorative elements on the front of the shield, which in my view really adds depth and character.

Sandpaper - I used quite a bit, two squares each of 30cm square 120/240 grit.

Jigsaw and Rotary Tool - As they are both power tools ensure that you observe the correct safety wear.


Starting off

Note: If you want a curved shield backing you can, without too much trouble, set up a form, glue the sheets together and clamp to suit. If you want to have some real fun you can make your own steam box and steam bend your wood, which is great on larger projects, but if you haven't had much woodwork experience I wouldn't recommend it. In any case here is a good resource on bending methods if that's what you'd like to do. An easy way to approximate the curve you want is to use a deck of cards and, looking side on, you can simulate each layer and change it quickly and easily to suit. When it's as you like simply take a measurement and cut your layer of ply to suit.

First of all you need to trace and cut out the separate layers of the shield. For a shield this size I've used three layers of plywood, though for larger projects you can use more layers as you see fit. Where the curve in the shield is will depend on how large you cut each layer. 


When all the pieces are cut you can glue them together. Be sure that you clamp them together or put some weight on them as they dry to ensure uniformity of adhesion. For glue I used epoxy filler as it's strong, quick to dry and durable.


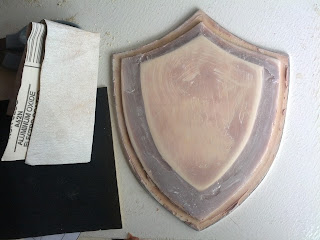
Once glued together use filler to smooth the steps between each layer, then sand. Repeat this until the finish is perfect (I used 3 layers). Try not to put too much on in a single layer; it's better to use multiple thin layers that are each sanded and shaped. Also make sure that each layer is left to cure fully before sanding and finishing.


Once the shield is smooth and shaped as you like it you can glue on the 'metal' detailing. Some of the pieces will need to bend to the shape of the shield, so you'll need to clamp them. Depending on the size of the shield you can use clothesline pegs (as I have), bulldog clips or builders clamps to do this. Be sure to leave it to dry overnight when doing this as the wood will naturally want to pull away, resulting in much cursing and stomping of feet.


Once all glued in place I decided to smooth off the joins to make it look like one solid edge, again using several layers of filler and a lot of sanding.


A thin undercoat layer will reveal the texture of the surface, and at this stage you can add/change detail as you please. I want the centre of the shield to have a ripple like texture when finished, so I used a rotary tool to roughen the surface.


You can use any number of different objects for the rivets. I found some great buttons that were perfectly sized for this project at my local sewing store, and simply smoothed off the back of each one and them glued them in place.


Now for the final details to be glued in place. Before undercoating again be sure to leave the shield to dry properly.


I applied 6 coats of undercoat, to ensure consistency and a final layer of smoothing (as consistent layers of paint fill small cracks/scratches).


After the 6 base coats I applied a single coat of Citadel black as it makes for a perfect painting surface, and is much flatter (less reflective) than other matt black paints that I've used.


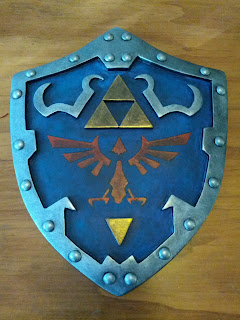
I painted all the raised parts first (basically all the metallic elements) and then stippled 5 layers of blended blue, turquoise, and white to the face of the shield. Finally, I used two wash coats (seen still wet in the image below) of blue and black to give depth and consistency to the stippled layers.


Once dry it was ready for the crest. I used a fine black felt tip pen to draw the outline. I did it freehand as I like small differences in handmade items, but if you prefer you can use a stencil (I'd recommend it).


Once outlined the crest is filled with two layers of black.


Then two layers of patchy crimson.


Then, to highlight and define the crest, two layers of blood red (the final blended with a little white).


Finally, a thick coat of clear lacquer is applied to the face of the shield and then oven baked for an hour on low heat. This gives the crest and blue background a lot of depth and colour and, in my humble opinion, looks fantastic. If you haven't worked with paint/wood/lacquer much before I wouldn't recommend this method, you're much better to paint on several thin layers of lacquer and let them dry normally. If you do want to oven bake the finish be sure you keep a close eye on it, place the shield on baking paper, keep the temperature low, turn on an exhaust/ceiling fan, open the windows and keep the oven door open 1/4 for ventilation. You can very, very easily make the paint blister or set fire to something so be careful and keep a close eye on it.


The finished product, showing off its glossy finish.


In part two I'll show you how I made the back of the shield, added detail (a leather strap and handle) and the hardwood stand I made to display the shield.

=============

Thanks for reading! If you found this tutorial interesting, fun or something else entirely I recommend that you check out my other tutorials, like the Westeros Map (Game of Thrones) that I made recently or my Steampunk Nerf Guns