Wednesday, March 27, 2013

How to make a Hylian Shield Pt. 1

One of my first major video game crushes was the very first Zelda, given to me by my parents for Christmas when I was 5. I absolutely fell in love with that game and played each sequel as they came out over the years, and to now see it be so popular is a delight. There is so much love and attention given to Zelda collectables, artwork and fandom in general. A friend of mine is similarly smitten by the Zelda series (in truth most of my friends have fond memories of playing a Zelda title), so I decided to make him a miniature Hylian Shield. As you do.

The shield itself is about 25cm tall (10") and 12mm thick, though naturally you can choose to just enlarge each element to suit the size you want to make it. This project is great as it requires only a few different elements, so if you haven't done anything like this before this is a pretty good place to start.


What you'll need

2.8mm Plyboard - You'll need around 1000mm x 250mm to make a shield of this size.

Epoxy Filler - The higher the quality, the better. I used around 100-120 grams in this project.

Buttons - These form the bold rivets located around the steel edge of the shield.

Water Based Paint - Because of the limited colour palette I only needed 9 colours. There are many brands to choose from but I use Citadel miniature paints as I've had a lot of experience with them and find them to be equal or better than any other product on the market.

Clear Gloss Lacquer - This is optional but will give the colour on the shield a much deeper hue with a reflective finish, in addition to protecting it. It also serves to divide the metal and decorative elements on the front of the shield, which in my view really adds depth and character.

Sandpaper - I used quite a bit, two squares each of 30cm square 120/240 grit.

Jigsaw and Rotary Tool - As they are both power tools ensure that you observe the correct safety wear.


Starting off

Note: If you want a curved shield backing you can, without too much trouble, set up a form, glue the sheets together and clamp to suit. If you want to have some real fun you can make your own steam box and steam bend your wood, which is great on larger projects, but if you haven't had much woodwork experience I wouldn't recommend it. In any case here is a good resource on bending methods if that's what you'd like to do. An easy way to approximate the curve you want is to use a deck of cards and, looking side on, you can simulate each layer and change it quickly and easily to suit. When it's as you like simply take a measurement and cut your layer of ply to suit.

First of all you need to trace and cut out the separate layers of the shield. For a shield this size I've used three layers of plywood, though for larger projects you can use more layers as you see fit. Where the curve in the shield is will depend on how large you cut each layer. 


When all the pieces are cut you can glue them together. Be sure that you clamp them together or put some weight on them as they dry to ensure uniformity of adhesion. For glue I used epoxy filler as it's strong, quick to dry and durable.


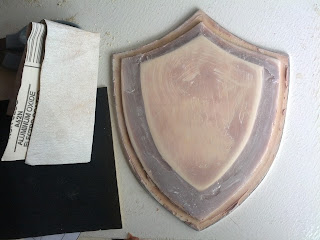
Once glued together use filler to smooth the steps between each layer, then sand. Repeat this until the finish is perfect (I used 3 layers). Try not to put too much on in a single layer; it's better to use multiple thin layers that are each sanded and shaped. Also make sure that each layer is left to cure fully before sanding and finishing.


Once the shield is smooth and shaped as you like it you can glue on the 'metal' detailing. Some of the pieces will need to bend to the shape of the shield, so you'll need to clamp them. Depending on the size of the shield you can use clothesline pegs (as I have), bulldog clips or builders clamps to do this. Be sure to leave it to dry overnight when doing this as the wood will naturally want to pull away, resulting in much cursing and stomping of feet.


Once all glued in place I decided to smooth off the joins to make it look like one solid edge, again using several layers of filler and a lot of sanding.


A thin undercoat layer will reveal the texture of the surface, and at this stage you can add/change detail as you please. I want the centre of the shield to have a ripple like texture when finished, so I used a rotary tool to roughen the surface.


You can use any number of different objects for the rivets. I found some great buttons that were perfectly sized for this project at my local sewing store, and simply smoothed off the back of each one and them glued them in place.


Now for the final details to be glued in place. Before undercoating again be sure to leave the shield to dry properly.


I applied 6 coats of undercoat, to ensure consistency and a final layer of smoothing (as consistent layers of paint fill small cracks/scratches).


After the 6 base coats I applied a single coat of Citadel black as it makes for a perfect painting surface, and is much flatter (less reflective) than other matt black paints that I've used.


I painted all the raised parts first (basically all the metallic elements) and then stippled 5 layers of blended blue, turquoise, and white to the face of the shield. Finally, I used two wash coats (seen still wet in the image below) of blue and black to give depth and consistency to the stippled layers.


Once dry it was ready for the crest. I used a fine black felt tip pen to draw the outline. I did it freehand as I like small differences in handmade items, but if you prefer you can use a stencil (I'd recommend it).


Once outlined the crest is filled with two layers of black.


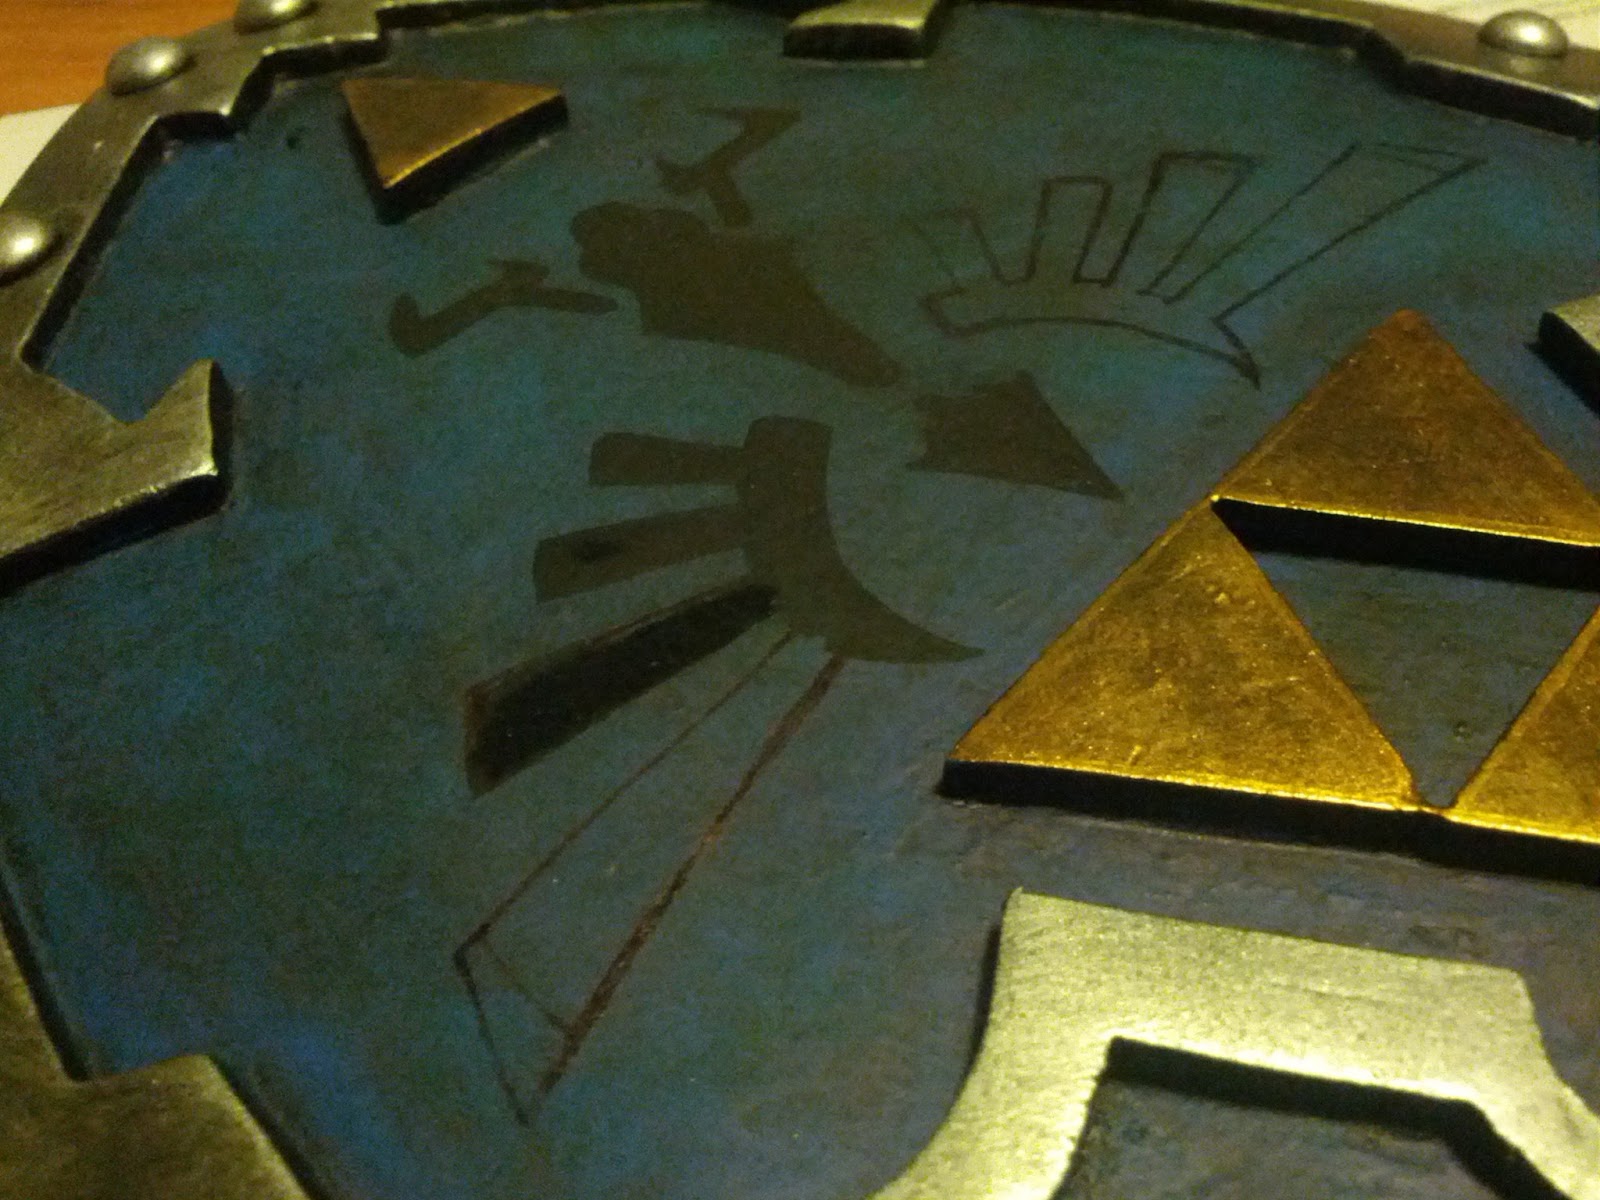
Then two layers of patchy crimson.


Then, to highlight and define the crest, two layers of blood red (the final blended with a little white).


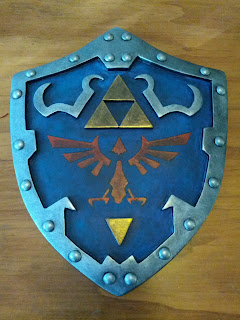
Finally, a thick coat of clear lacquer is applied to the face of the shield and then oven baked for an hour on low heat. This gives the crest and blue background a lot of depth and colour and, in my humble opinion, looks fantastic. If you haven't worked with paint/wood/lacquer much before I wouldn't recommend this method, you're much better to paint on several thin layers of lacquer and let them dry normally. If you do want to oven bake the finish be sure you keep a close eye on it, place the shield on baking paper, keep the temperature low, turn on an exhaust/ceiling fan, open the windows and keep the oven door open 1/4 for ventilation. You can very, very easily make the paint blister or set fire to something so be careful and keep a close eye on it.


The finished product, showing off its glossy finish.


In part two I'll show you how I made the back of the shield, added detail (a leather strap and handle) and the hardwood stand I made to display the shield.

=============

Thanks for reading! If you found this tutorial interesting, fun or something else entirely I recommend that you check out my other tutorials, like the Westeros Map (Game of Thrones) that I made recently or my Steampunk Nerf Guns


Thursday, March 7, 2013

How to make a Westeros Map - Pt.2

Texturing

Now that there is a map and base to work with it's time to add texture. This isn't necessary if you don't want to do it, but it makes for a much more impressive map and gives it a lot of depth.

I added texture in two ways. First, I built up mountain ranges and forests using high quality two part construction filler. I applied using strips of cardboard and skewers and gave texture to the forests using an old tooth brush. Secondly, I engraved into the map wood using a small rotary tool with a scribing head (like a Dremel) to add rivers, canyons, lakes and other details. I also used the rotary tool to shape the filler that I used for mountains and forests, not only to help the shape but also to give it some roughness. 

Overall, adding texture is a time consuming, smelly, messy, finicky and dusty job. Whatever you do don't do it inside or in an enclosed space. Make sure there is plenty of ventilation and preferably wear a dust mask.


Above: Dorne, ready for an undercoat.

Below: For comparison, the mountains on the left have been roughed up with the rotary tool, the ones of the right haven't.


Above: Major navals ports and strongholds will be represented on the map by some lovely buttons and stamped steel brads that I picked up at the local sewing shop. Each major house will have it's own sigil hand painted on a shield, which I've taken from my Warhammer parts box.

Below: The Wall, sculpted and ready for undercoating. I used some balsa wood for the core, filler to build it up and then the rotary tool to shape it.


Above: The fully textured, completed board. At this step I would have scribed 'Westeros' into the title plaque at the top, but I hadn't yet decided if that was what I was going to do so I left it till later.

Below: Three thin sprayed coats of flat black water based paint later (don't use gloss or oil based paint). Once you've undercoated the board all the texture will show through. This is the final stage that will allow you to adjust the texturing and then recoat easily, so make sure that it's 100% how you want it before you pick up a brush!


Painting

This step should by far take the longest. Additionally, it's the easiest to get wrong so practice first on another piece of undercoated wood to ensure you're happy with your technique and the finish you achieve. I primarily used two methods for the map - drybrushing and stippling. For drybrushing I used 8-10 layers, for stippling around 12-14. You can do far less than this but I'm pedantic, so it had to look spot on. For all the painting I used four brushes - a 0 and 2 sized miniature brushes, a 1/2" flat brush and a 1" round.


Above: All the paints that I used on this project.

Mountains, forests - On textured parts of the map drybrushing (find out how to do it by reading the terrain board tutorial on this site) is ideal. I recommend that you do all the drybrushing before stippling as drybrushing can be quite messy and may ruin other parts of the map if they've already been painted.

Grass, dirt, snow, sand - This method is simple but is similarly really easy to mess up. Basically, load up a larger brush (1/2" flat brush was what I used) with a little paint and then, similar to drybrushing, wipe most of the paint off it. With the small amount of paint left on the bristles hold the brush vertical or on a slight angle and dab the surface repeatedly. Each time you do this a few dots of paint will touch the board and over a large surface area using a few layers this effect can look fantastic. Sounds easy, but it takes practice to get a good finish. I recommend practicing and varying your technique to achieve a different look. For example, sand looks better with many layers of dots added with the brush dead vertical. Grass, however, benefits from the brush being on a slight angle so that the dots elongate when the bristles touch the surface, creating what looks like small tufts of grass. 

When painting always ensure that you have some water to rinse brushes out/thin paint and paper towel/tissues to dry them. Make sure that you rinse out brushes immediately after you're finished using them - if you don't they will quickly get destroyed.

As an example of stippling, below is how I got the snow finish in The North.

 
Stage 1 - A few layers of varying shades of grey sets the base, on top of which a heavy stippled coat of turquoise.


Stage 2 - A few more layers of grey and then some more turquoise on the flat areas.


Stage 3 - Building up in heaviness to a fine light grey stipple.


Stage 4 - Three top layers of near white in varying shades, finely stippled.


Stage 5 - Strongholds, ports, rivers and sigil shields all receive a coat of black undercoat and are then painted to suit.


Stage 6 - Three coats of a mixed black/blue/grey base are applied to the ocean areas, with three layers of detail added relative to the ocean current direction. I could've put a lot more detail in to the ocean areas, but I didn't want it to detract from the map. The ocean is a good background as opposed to a heavily detailed feature. The 50c piece is present for scale comparison only.

Below is the fully painted map (except for the 'Westeros' title). Each area had a palette of around 6-8 colours, with colour blends for bases and highlights mixed to suit. 


All that was left to add was the title. I wanted the map to be consistent with the TV/book series, so with a little research I tracked down a very similar font to the one used on the TV series advertisements - Trajan Pro Bold. The only difference was the vertical lines in the 'O', but these were easy to add. You could use a stencil to provide an outline for the rotary tool but I chose to do it freehand with a printed copy of the text on hand for reference (only do this if you're very comfortable using a rotary tool). Once engraved I gave the now bare wood two coats of black and two coats of metallic gold, with a touch up boat of black to neaten up the text.


Above: The finished title, before a touch up coat.

Now that the board is fully painted you can choose to put a coat of clear lacquer on it or leave it bare. With a clear coat the board will resist stains, ageing and dust. Without it the board will show detail better and look much crisper (in my humble opinion) but will be far more fragile finish as a result. I'm going to leave it as it is with no clear coat, but a gloss coat over the water and a matt coat on the land was considered a great deal. In the end it's entirely up to you.

At this stage your painted map is complete! You could tidy up the edges and hang it on a wall right away, or like me you could add some finishing touches to make it look really special.

Check out part 3 for how to add finishing touches and the final, completed map.


How to make a Westeros Map - Pt.1

I'm a big fan of A Song of Ice and Fire, the book series upon which the TV series Game of Thrones is based (hell, I adore the show aswell and I can't say that about many book to film adaptations). They really got the casting right, didn't they? Anyway...

A while back I bought a copy of A Game of Thrones: The Board Game (2nd Ed.) and proceeded to play a few games with friends. After getting through the unnecessarily dense rule book I really love the game, it's tense and relies on strategy, teamwork, backstabbing and a little bit of luck. The game tokens, cards and other components are quite lovely and really do the the universe justice. But I really loved the board. I have a bit of a thing for fantasy maps, so with this in mind I decided that I would make a 3D Westeros map from scratch and really go to town on the detail. One could use the method in this guide to make a board that will suit almost all medieval/fantasy board games, though after mulling it over I've decided it'll be for decoration only. The amount of game related detail I'd have to add would ruin the aesthetic in my humble opinion, and this really is meant to be looked at rather than played on. That, and as I don't have to worry about it being a playable surface I don't have to worry about it being a functional piece. And now to the drawing board!


What you'll need


Before starting the build it pays to plan and figure out you'll is required. Here is what I used (power tools not pictured):

Map outline - I used the board game board to trace the outline of the map, but optionally you could get a printed copy of the map using an image from the internet (see the bottom of this post for some suitable links).

Backing board - You could use chipboard or MDF, but a piece of quality edge laminate board will be much more durable, be far less prone to warping and look far better.

Map/Detail board - This is what most of the board detail will be made from. As this will be painted and detailed it doesn't matter what it looks like, so I used 6mm (1/4") MDF as it's easy to cut and shape, plus it adheres well to the backing board.

Tracing pad - A3 or bigger.

Pencils and a couple of fine tipped permanent markers - For tracing and map layout.

Brushes - I used about 6-7 making this board, ranging from a 0 fine tip miniature brush to a 3" gloss brush.


Paints - Make sure they're water based. I used Citadel paints and a commercial brand gloss.

Spray undercoat - I used Citadel Chaos Black, though any matt black water based paint should do.

Wood file/Dremel - I used a fine/med grade 1" flat file and a Dremel with assorted pieces.

Scalpel and/or Scissors - I used both.

Filler - I'm using Builders Bog, but you can use any fine, durable filler. Car filler (bog/bondo) is also suitable, though the tougher the filler the better as it will be subject to more than a few dings with regular play.

PVA Glue - Always good to have some on hand.

Sandpaper - I used a few sheets of 80 and 120 grit sandpaper.

Jigsaw/Router/Coping Saw - I used a jigsaw and router (not pictured) to shape my board, though a coping saw and file will do the job. That said a jigsaw and router make life much, much easier though they are both dangerous tools and as such you should know what you're doing with them lest you hurt yourself. I can't state this loudly enough - power tools are dangerous, especially routers and saws, and as such be sure to wear the appropriate safety equipment whilst using them.

Moulded Trim and Brass Hardware (optional) - When the board is complete I want to protect the edges and frame it nicely, so I'm using 28mm moulded hardwood trim, brass nails and brass corners with brass tacks. This is entirely optional but I recommend it as it looks great and evens out the edges to give it a uniform, professional aesthetic.


Making the board

Step 1 - Tracing and cutting out the map

This is a seemingly simple step but know that it is fiddly, precise and time consuming. As you can see in the image below, I needed to use three sheets of tracing paper to trace the board in full. I used a pencil to do the tracing and a scalpel and pair of scissors to cut out the shape. This step is fairly easy but I will state this - take your time, do it once and do it well. If you make a mistake you will not be a happy individual.

N.B. - I have cut out all the islands around Westeros and put them aside, as they'll be added later. The process is the same as the map except on a smaller scale.


Left: The three pieces of tracing paper, ready to be traced on. Right: Traced and cut out carefully.  

Once that's done it's time to get a print of it on the map/detail board (6mm MDF, in this case). Be sure to put blu-tack/tape in the middle of each piece of tracing paper to keep it still, and spray from the middle of the paper to the outside and not the other way around (as you'll blow the tracing paper away). Also, keep the used pieces of tracing paper as you might want to use them again (and believe me, you won't want to trace the map again!).


Above: The tracing paper before and after being used as a spray stencil.


Step 2 - Cutting, shaping and putting it all together.

As with tracing the map this might seem to be a fairly easy task, but again it is fiddly, time consuming and it is very easy to make a mistake (and even harder to correct it). Once again take your time, do it once and do it accurately.


Above: Rough map cut out using the jigsaw, after which I used a router and jigsaw to cut out the detail. The edges will be rough after being cut, so be sure to use sandpaper to tidy them up.


Below Left: The complete map cutout and backing board.   Below Right: Placing the moulding against the board's edge I aligned the top of the map to it to make sure than when it's finished it all fits flush together.


Above: Though the glue would've been more than enough to hold the map to the backing board I used a dozen 1" tacks to hold the map in place. This also ensures the map doesn't move accidentally because once the glue is dry you'd destroy it before you're able to adjust its position.


Below Left: I used a two part epoxy glue to adhere the map cutout to the backing board. Make sure you sand wood surfaces thoroughly before you apply the glue, and be sure to apply it evenly and give it plenty of time to set (I left it overnight).   Below Right: The finished board, ready for detailing. The islands were rather fiddly to get right but they look great.


Step 3 - Preparing the board for detail.

I used a couple of permanent markers to outline the features of Westeros on the board before adding detail to make sure everything was laid out correctly. Lucky for me a short way into the build I was given a set of maps of the entire Song of Ice and Fire world by some close friends for my birthday (thanks again Kendall and Dan!) so I had great reference material to work with, but if you were to jump on Google you'd find a number of great maps to use (I've put links to a couple of good ones at the bottom of this post). I recommend you colour code the features so that you don't mistake a river for the edge of a mountain range (or vice-versa), and double check everything before proceeding. 


Above: The completed blank board, ready for detail.

Check out part 2 to see how to add detail, paint the board and apply the finishing touches.


Westeros Map Links:

http://gameofthrones.net/images/Westeros_Maps/map_of_westeros.jpg
http://barbariana.com/wp-content/uploads/2011/11/Map2-2_Map_of_Westeros_Original.jpg
The 'Where's Waldo' Westeros Map (warning: big [!] file) - http://www.fanboy.com/wp-content/uploads/2011/07/Westeros.jpg

How to make a Westeros Map - Pt.3

Finishing Touches

To finish off the map I decided to add some moulded hardwood trims with brass nails and brass corner brackets. I wanted the edging to look like it was straight off of a carriage, so I used 3 coats of gloss, lightly sanded between coats and applied with a clean cloth. The holes for all the nails/tacks were pre-drilled to ensure the wood didn't split and that positioning was perfect.


Above: You could use a compound saw or take it to your local hardware store to be cut to size, but I prefer the old fashioned way; a hand saw and a mitre box. It also allows you to make adjustments on the spot and be incredibly accurate.

Below: Each nail hole was pre-drilled and nails placed for ease of attachment. A tip - line up all your edging and only half nail in the centre nail for each side. This allows you to easily check placement, how they line up and allows you to make sure all the mitres align correctly. If not you can easily remove each piece and adjust it, then put it back on with the same nail. Whatever you do, DON'T put more than one nail in each side until you're sure it's a perfect fit.


Below: Brass corner brackets were added mostly for aesthetic purposes, but also because they protect and hold each corner together tightly.


The Final Product

It took three months of my spare time and more than a few curse words but here it is, complete and ready to hang. I may still change my mind about putting a clear lacquer on it, but for now I love it just as it is.


I'll be making a new tutorial soon for a custom piece I'm making for a friend. It'll be based on one of his (and my) favourite video game series, so keep an eye out. I hoped you enjoyed this tutorial as much as I'm enjoying my new map, all the best!